The Boat Yard

1-15-03 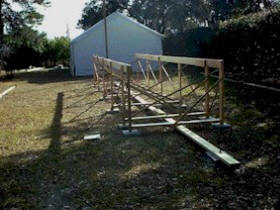
This is the start of my building form. The
white tent in the background is my workshop.

Building the frames.
4-20-03

My building to keep the weather off my boat.
5-21-03

The frames on the building form.
8-20-03

The Transom on the frame table.
9-3-03

Building the stem and transom knee.
9-16-03

Installing the stem.

Installing the keel plank.
11-10-03

Installing the longitudinal members.
1-4-04

Longitudinal tongue and groove planking.
2-5-04

Engine rebuild shop.
4-23-04

Longitudinal planking complete
5-23-04

The first layer of the double diagonal planking.
6-9-04
The first layer of topside double diagonal planking.
6-13-04
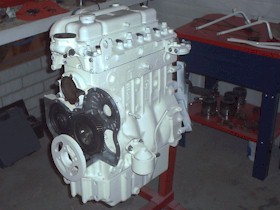
My first engine almost all put back together.
7-8-04

The double diagonal planking is complete.
8-14-04

Hurricane Charley destroys my boat building.

My boat is under there somewhere.
8-20-04

My new building going up thanks to
my brother, youngest son and son in law.
my brother, youngest son and son in law.
9-2-04

My new building is finally finished.
9-25-04

Hurricane Francis No damage but
Hurricane Jeanne Claims my new Roof!
Hurricane Jeanne Claims my new Roof!

My workshop tent is no more.
I've moved everything into the boat building.
11-12-04

My first engine with the Bowman
marine conversion kit installed.
marine conversion kit installed.
12-12-04

The hull complete with skeg. It's all
sealed with epoxy and ready for covering.
sealed with epoxy and ready for covering.

Xynole Polyester fabric going on the hull.
1-2-05

My gin pole is up in preparation for turning the hull.
1-16-05

Building the square turning wheels to roll the hull over.
1-31-05

The hull is all painted and ready for the turning wheels.
2-5-05

Turning wheels installed and ready to roll her over.

Over she goes!

She's half way over!

Going back down.

Turning wheels are off and
hull is leveled and blocked.
hull is leveled and blocked.
2-24-05

The inside of the hull is all cleaned
up and sealed with epoxy.
up and sealed with epoxy.
3-26-05

Framing at the bow.
4-7-05

6-3-05

6-18-05

6-22-05

trunk cabin, and pilot house.
7-21-05

8-31-05

10-20-05

11-5-05

12-7-05

1-18-06

2-27-06

4-13-06

Bulwarks covered on the outside.
5-13-06

6-15-06

for runup before installation.
6-17-06

layup on the mold over her right shoulder.
6-29-06

covered with kevlar, ready for paint.

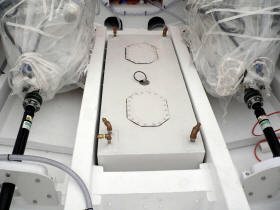
7-13-06

from mold with baffles installed
8-8-06

that operates the wing on the rudder.
9-26-06

11-17-06

access panels and fittings installed.

tested and ready to install
12-7-06

test stand and now it's going into the boat.
12-27-06

01-16-07

4-10-07


and thrust bearing installation.
5-5-07

7-21-07
installation between engine stringers.

8-3-07

with my homemade clevises installed.
8-15-07

9-14-07

under steps to forward cabin.
9-25-07


10-4-07

10-31-07

12-03-07

01-23-08

wiring conduits on the bridge
02-24-08

03-02-08

flee market so had to rebuild it.
11-06-08


11-22-08


01-30-09

02-15-09


05-04-09


10-08-09

12-16-09

02-05-10

02-27-10

4-7-10

5-4-10

Fly bridge paneling.
7-24-10

These are brackets to mount LED lights
in for backlighting my instrument panels

LED brackets installed ane start of wiring.

Starboard instrument panel all lit up.
12-10-10

This is the beginning of
my mast on the workbench.
2-2-11

Swim platform framing.
3-11-11

Swim platform is finished.

Installing headliner in salon.
4-1-11

Paneling the salon.

Installing crown molding and chair rail.
7-10-11

Galley cabinet framing.
11-02-11

Lower cabinets are painted and
varnished, this is the beginning
of the upper cabinets.
11-20-11

Countertop, stove top, and sink installed.

Styles rails and panels. 40+ doors.

Microwave / convection oven installed.
12-27-11

Window trim in salon.

I put lighting in all my cabinets.

Cabinets done in head.
12-4-12

Cabinets and V birth done in stateroom.
12-18-12

Installing flooring.
1-26-13

Washer dryer installation
under galley cabinets.
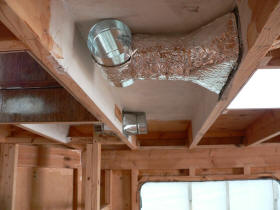
2-8-13

Propane water heater exhaust.

Throttle control linkage hookup.
2-12-13

Refrigerator Installed.

My bridge is finally finished.
3-12-13

Framing for navigation station,
entertainment center,
and seat for dinet.
3-24-13

My desktop on the workbench.

My banister on steps going
up into the bridge.

Two steps lift up to access
house battery bank.
5-5-13

Battery access steps closed.
5-14-13

Flooring installed in salon.

Fold Up TV cabinet installed.
6-4-13

Engine exhaust hose installation.

Fire suppression system installed.
6-24-13

This is the circuit board that shuts
everything down if fire suppression
system is activated.
7-25-13

Upholstery completed on seat cousions.
7-30-13

This bracket mounts onto the
bottom of the mast and allows me
to drop the mast down for bridge clearance.
8-24-13

Rudder angle indicator sender installation.
9-30-13

Battery isolator installation.
10-14-13

My mast is completed and
ready for installation.
12-26-13

Stainless steel box to mount
winches in for mast boom.

Valances for the windows in the salon.

Handrails around boat deck.
3-14-14

Valances installed in salon.
4-17-14

This time I'm tearing the building
down myself, getting ready to
move the boat to the water.
5-1-14

Another wall comes tumbling down.
6-5-14

The truck is here to haul her away.

The crane to lift her with is here.

The boat is all rigged and ready to lift.

She's up and heading for the trailer.

We're headed down the road
for Ft. Pierce on the coast.

Unloading the boat with travel lift.
6-11-14

She's all put back together
and ready for launch.

She's over the water ready to get wet.

The Molly B gently settles into the water.

We back out of the launch bay.
6-11-14

We're on our way at last, at last!
No comments:
Post a Comment